Friday 31 October 2014

Trick or Treat?

Hey all,

Halloween has approached so fast and is today!

So for those three words everyone uses on October 31st, I ask you, Trick or Treat? Treat, I'm sure you say. Well now I am going to share with you four simple yet scarily delicious treats that you may be able to whip up just in time for whatever you are doing as most of them are super quick. They will get you in the Halloween mood and make your night just that bit more atmospheric, and sweeter...

I found all of these ideas from pictures on Pinterest and then looking at the photos, invented the method as none of the had instructions in the captions. If you want, you can follow me on Pinterest, Rosie C.
 
  • To begin with, I am going to show you how to make 5 Dracula's Dentures:

INGREDIENTS:
5 large cookies
red food colouring (I used the gel one by Dr Oetker, 10g)
75 mini marshmallows, preferably white ones
5 blanched almonds, halved to make 10
75g butter and 175g icing sugar - although this made slightly too much butter icing

METHOD:
Cream the butter and the icing sugar together till there are no lumps, but it is of a thick consistency. This part is quite tricky as it makes your arm ache if you don't use a whisk, but keep persevering because it will come together all of a sudden.
Next, add your red food colour, distributing it evenly throughout your butter icing. It is best to do this gradually, however don't be afraid of putting a lot in, because the redder the better; it will be Dracula's blood-stained gums. Appetising! Continue to mix so there are no white patches and everything is even and smooth. I did in fact use the whole tube of gel, which turned the mixture a very dark pink, but luckily it didn't affect the taste.
Now cut each cookie in half making them as even as possible, then spread the red butter icing all ten halves. BUT, not on both sides. On 5 halves, you must spread on the top of the cookie, and on the other 5, spread it on the bottom.
Then with 15 mini marshmallows, dot them all around the outer edge of the cookie, but only on five of the halves, and make sure they're the halves with the icing on the top rather than bottom of the cookie!
Take the other none-marshmallow halves and stick them on top of the marshmallows, then stick the halved almonds on, they are the fangs!
Enjoy!

  • I will now give instructions on how to make 5 gingerbread skeletons, which are no way near as technical as the Dracula's Dentures:
INGREDIENTS:
5 gingerbread men, ready made or make your own, mine were ready made
some form of icing, the ready made ones often come with icing in a decorate your own pack
Possibly a piping bag or icing syringe thing

METHOD:
Make your gingerbread men if they aren't ready made.
Make your icing if it isn't ready made.
Squeeze it through a piping bag/icing syringe/tube and begin to design a skeleton on the gingerbread, however you like.
Simple!

  • The third ghoulishly good treat is 12 Bat Cupcakes:
INGREDIENTS:
CAKE:
2 eggs
4oz self raising flour
2 table spoons cocoa powder
1 tea spoon baking powder
4oz caster sugar
4oz margarine
A spot of milk, but only if needed
BAT TOPPING:
12 circular, thin chocolate wafers/biscuits
Large chocolate buttons
75g butter and 175g icing sugar
Cocoa powder
Some squeezy icing - the ones that come in tubes are good and easy to control

METHOD:
CAKE:
Preheat your oven to 170 degrees Celsius.
Tip all of your ingredients into a large mixing bowl, and mix with an electric whisk until all is smooth and combined. If you're having trouble mixing it all together as it is too dry, add a dash of milk, but don't go overboard because you can't take it out again!
Put 12 cake cases in your baking tray, and spoon the mixture into the cases till they're about half full.
Bake in the oven for roughly 16-17 minutes.
Once the time is up, take them out of the oven and stick a knife into the middle of one. If the knife comes out clean, the cakes are done.
Once they are done, leave them all on a wire cooling rack for about an hour to cool down. Then you can make them into bats...
 BAT TOPPING:
I made these cupcakes just from a photograph, so I did the topping slightly wrong. I thinly sliced the top of the cake off, cut it in half and stuck it in icing for the wings, however now I realise that thin chocolate wafers or biscuits were used instead. This of course works better as the wings are sturdy, and do not flop over. I am going to tell you how to make the correct version, instead of my version.
Like with the Dracula's Dentures, cream the butter and icing sugar together, then add the cocoa powder. 
If you have a piping bag, spoon the butter icing into that, and then pipe it on to the cake in a neat swirl.
Break your chocolate wafers/biscuits into equal halves and then stick them into the icing so that they look like bat wings.
Add a large chocolate button in the middle for the bat's face.
With icing, draw eyes or fangs or whatever you like. 
Now you can eat!
  
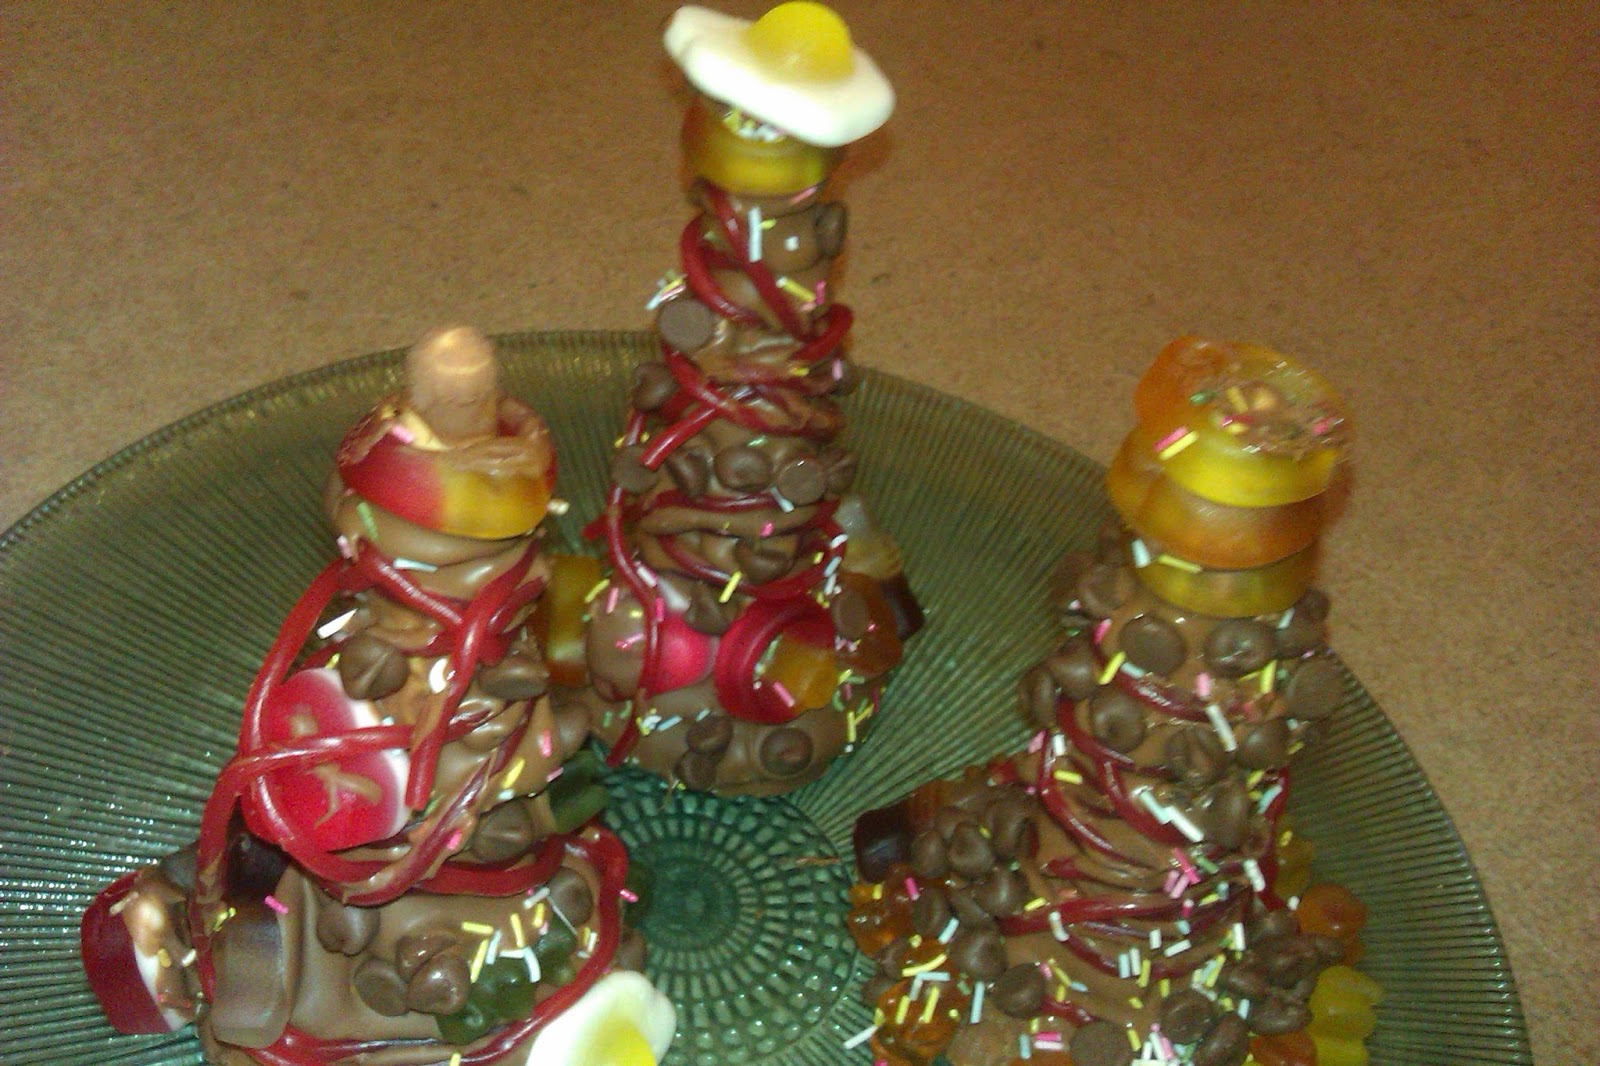
  • Last but not least, I'm going to show you how to make Witches Hats. These are the easiest of the four, and pretty much idiot-proof. This recipe will make as many as you like, depending on how generous you are with toppings!

INGREDIENTS:
Wafer icecream cones
200g chocolate
Whatever sweets you like

METHOD:
Melt your chocolate in the microwave or by heating it over a pan of boiling water.
Place one of your cones on a plate, point facing up, then take a large spoonful of chocolate (or however many spoonfuls you would like) and tip it over the cone so that all is covered by chocolate. 
Whilst the chocolate is still melted, decorate the hat. We used strawberry laces, haribos and sprinkles.
Once you're done, leave them to set in the fridge.
Come back later and devour!

Finished! They were all of my fanGtastic recipes; I know it may seem last minute to make these recipes but I wanted to put the post up today. 
Happy Halloween, I hope you have a spooktacular night or day, whatever you are doing!

Rosie x
 
 
SHARE:

Friday 24 October 2014

Things I Love About Autumn

Hi!

As you may have seen in my last blogpost, I had to put in a link to claim my blog on bloglovin', well that was successful; make sure you follow me on there, rosalynwrites.

Anyway, we're basically now half way through Autumn *sigh* but seeing as Autumn is my favourite season, I thought I should write a blogpost highlighting the best bits. There are loads, trust me.
  
I may as well start off with hot chocolate, because who doesn't love hot chocolate? This year my hot chocolates went a up a level when I added squirty cream and mini marshmallows. And then the cream melts into the hot chocolate and the marshmallows go all gooey and ahh... Heavenly.
 Another obvious one has to be the cosy jumpers we all live in! They're so warm to wrap up in, and then winding soft scarves over the top is extra snugly. Fluffy socks are also an essential, to warm up those toes!
I love autumn/winter fashion in general - tights and boots, scarves, tartan, leather, monochrome, big coats and jewel colours etc.

Whilst I'm on the topic of comfy and cosy, I have to mention onesies! I love it when it gets colder at night; I can finally wear them! I have a stripy onesie and a giraffe one that I love, but I need to get another as I just grew out of a hedgehog one :(
Beautiful autumn skies has to be another one. It's so beautiful when the sun is just setting; so many colours blend together - purple, orange, red - to make a vibrant explosion, which is particularly stunning against a black silhouette.
Autumn is also the time when I have more longer, relaxing bubble baths. At the moment I have a few lush and soap & glory products that smell sooooo good!
 
I also really enjoy setting off fireworks on November 5th - or going to a display - and watching the amazing colours that pop all over the sky, then eating tasty food and steaming puddings. Of course, there's Halloween too. I love it at this time of year when it gets spooky and there are pumpkins, sweets and creepy characters everywhere!
Autumn also means that Christmas is a few months away, and that's exciting! Christmas is my favourite celebration of the year!
I recently got some new fairy lights that I have strung around my window, and it's really nice turning them on in the evenings and afternoons when it gets dark outside. Can't forget about the candles either! I love watching them flicker and glow, and even if you don't burn them, they make the whole room smell nice and make nice decorations.

 I love walking through piles of leaves on the ground, listening to them crunch and looking at all the amazing colours on the ground. It's also great fun finding the shiniest, reddest, biggest conker!
 
Finally, I just really like the general cosiness of autumn, and when it's raining outside and I'm all tucked up inside, under blankets, or reading a good book or watching a film.
 So they were the main things I love about the autumn time, I hope you enjoyed reading this post. Let me know in the comments what your favourite thing is about autumn, and don't forget to follow!
You can look forward to a Halloween post soon, but that's it for now,

Rosie x
SHARE:

Thursday 16 October 2014

Plum Purple Eyeshadow Look

Just a link I have to put in my newest blogpost to claim my blog on Bloglovin' 

<a href="http://www.bloglovin.com/blog/13004695/?claim=px4cuv6uwpn">Follow my blog with Bloglovin</a>

Hello, I have an exciting post today!

First of all, I have made an account on bloglovin', so go ahead and follow me on there - it's just 'rosalynwrites' again.

But now to the important part...
Recently it was my birthday and I was lucky enough to get the Naked 3 palette by Urban Decay. Since then I have been playing around with my different eyeshadows, experimenting with colour, creating different looks, and generally having fun, now that I have a wider variety of eyeshadows.
Over the weekend, I came up with a plum coloured eyeshadow look that I have never done before. It has a definite purple theme, but there are some pinky tones, as well as some blues. I think it's perfect for this time of year when the jewel shades come into season - forest greens, vampire reds, deep purples, midnight blues etc.  
I thought that a step-by-step tutorial focusing on the eyes would be the perfect seasonal blogpost, and I'm really excited to share it with you all!
Let's go...


STEP 1 

After I had applied my concealer, BB cream and setting powder, I primed my eyelids with one of Urban Decay's eyeshadow primer potions - I used Sin - and then I blended and smoothed it out evenly across both lids with my finger.

STEP 2 

Next, I took my Maybelline 24hour Colour Tattoo cream eyeshadow in Vintage Plum on a fluffy brush, and basically did the same thing with that as I did with the primer potion, only that I took it a little higher than my lid. It is important to blend, to make sure there are no harsh lines.

STEP 3 

Using my 17 eye palette, I took two of the colours Vengeance Purple (navy with purple flecks) and Lilac (a reddish purple) together on a flat brush and applied them to the outer third of my eyelid, blending towards the middle and up towards by brow bone. I repeated this until the two colours had merged nicely with Vintage Plum, and everything was gradual. 


STEP 4

This is where my Naked 3 palette comes in! Using the double ended brush that comes with the palette, I mixed Darkside and Blackheart together (both of which are purpley red toned), and lightly applied the mix to my crease with the crease end of the brush. Then with a fluffy brush, I blended and blended, up and down, until all the colours on my lid were working well together, and the transitions into different colours were gradual. I also dragged the colours lightly along my lower lash line, nothing dramatic, it just made my eyes stand out a bit more.


STEP 5

Now that the darker half of my lid was complete, I had to do the inner half, and add some light. So, using the shadow end of the Naked 3 brush, I took the colour Buzz, a gorgeous pigmented purple pink shade and patted it all over the middle and inner part of my lid. I patted rather than swiped for the full colour, and this powder also has a lot of fallout, and I didn't want to look all glittery and shimmery to the left and right of my nose (as nice as that may sound!)


STEP 6

I have an old palette by Technic that I got from a magazine years and years ago that only has three colours, but I've hung onto it because the colours are sometimes useful. I used a small lip brush - which I would never actually use on my lips as I find it weird to apply lip products with brushes - and dabbed it into a pastel lilac colour and brushed it into the inner corner of my eyelid to brighten my eyes and bring light to them. I find lip brushes really useful for things like this, as they are small and neat and fit in inner corners.

STEP 7

Back to the Naked 3 palette again! Using my finger I applied the lightest colour, called Strange, to my brow bone to hightlight that area, and highlighting your brow bone also makes the colours on your eyelid stand out more, because of the contrast.

STEP 8

All eyeshadow is complete, nearly done. To finish off my eyes, I drew a brown eyeliner along my waterline to bring out my green eyes, and add more definition to them. Last but not least, I applied mascara to my top and bottom lashes using the Big Fake Curves by Collection. 

All done! The colours I have used on my eyes make me feel all festive for autumn: pretty twilight skies in the evenings, sweet berries growing on the hedges and plum tones, the eerie purple glow of halloween, bright, bold fireworks on November 5th and cosy burgundy jumpers.

 I hope you guys enjoyed reading this tutorial, and maybe it's given you some ideas for seasonal eye makeup? I really enjoy trying new things, and hopefully a few of you will try this out. Put your own spin on it, add things, take steps away - let me know in the comments if you do!

More posts to come soon,

Rosie x
SHARE:

Wednesday 1 October 2014

Book Worm Wednesday: September Books

Hello all,

It's that time again! I haven't given up with the idea of monthly Book Worm Wednesday - book reviews/recommendations for those who are interested. This month I have two books to talk about, as I went back to school 3 weeks ago and have been quite busy since.


If I Stay by Gayle Foreman

You probably are familiar with this title, and you probably aren't surprised that I have been reading it - who hasn't? What with the film coming out last month and all.  

The way I interpret the cover is that all the little squares are significant parts or fragments of Mia's life that she looks back on, whilst pondering her big decision. That may not have been the intention of the person who made the cover, but that is how I see it.
   'If I Stay' was the first book I read in September, and I really enjoyed it. It is about a girl named Mia, whose world is turned upside down and inside out after a car accident involving her and her family one wintery morning. She then finds herself out of her body, which has slipped into a coma, and begins looking back on her life and her dreams for the future. Eventually, Mia realises that it is only her who can make the big decision - will she stay, or will she go?
   I would definitely recommend this heartbreaking, heartwarming story. I really need to go and see the film now!


Earthbound by Aprilynne Pike

I thoroughly enjoyed 'Earthbound'.
I don't feel that the cover gives much away about the book, or fits it particularly well, however the content was very enjoyable to read.
   'Earthbound' is about a teenage girl named Tavia Michaels who is recovering from a plane crash, and was the only survivor. She begins to worry when she starts seeing things - glowing triangles and a mysterious boy. 
   Being tracked down by killers, and on the run with a boy named Benson - the only person she feels she can trust - Tavia finds herself in terrible danger, and time is running out. Tavia has questions. Who is the boy she keeps seeing? Was the plane crash really an accident? And who are the people hunting her down?
   Definitely add this book to your reading list! I'm sure you will enjoy it just as much as I did.
   
   So they are my two book recommendations for September, I hope you enjoyed reading. The next Book Worm Wednesday will be posted on November 5th. Please follow my blog for more - I have another seasonal post planned :)

Rosie x
SHARE:
Blogger Template Created by pipdig